
10BASE-T FPGA interface 2 - IP/UDP over Ethernet
Let's concentrate on Ethernet/IP/UDP packets.
These packets are simple to produce; yet powerful, they can make their way on the Internet (and be sent anywhere in the world!).
Here's an example:
55 55 55 55 55 55 55 D5 00 10 A4 7B EA 80 00 12 34 56 78 90 08 00 45 00 00 2E B3 FE 00 00 80 11 05 40 C0 A8 00 2C C0 A8 00 04 04 00 04 00 00 1A 2D E8 00 01 02 03 04 05 06 07 08 09 0A 0B 0C 0D 0E 0F 10 11 B3 31 88 1B
Read on, it is decoded below.
Each protocol adds its own functionality and is embedded into a lower level one.
The packet shown above is decoded here:
Download it here. Source code is included (Delphi 6 for now - careful at Delphi XE2 as one user reported incorrectly generated packets...).

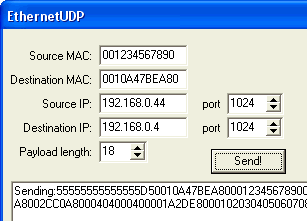
Every time you press the "Send!" button, the software builds a packet, displays it and sends it to the serial port (that will be useful later in part 3 of this project).
These packets are simple to produce; yet powerful, they can make their way on the Internet (and be sent anywhere in the world!).
Here's an example:
55 55 55 55 55 55 55 D5 00 10 A4 7B EA 80 00 12 34 56 78 90 08 00 45 00 00 2E B3 FE 00 00 80 11 05 40 C0 A8 00 2C C0 A8 00 04 04 00 04 00 00 1A 2D E8 00 01 02 03 04 05 06 07 08 09 0A 0B 0C 0D 0E 0F 10 11 B3 31 88 1B
Read on, it is decoded below.
Protocol stack
The packet uses three different protocols: Ethernet, IP and UDP (low to high level protocols).Each protocol adds its own functionality and is embedded into a lower level one.
- The UDP part contains the data to be sent (the "payload").
- The IP part allows the packet to be routed through the Internet.
- The Ethernet part allows the packet to be sent locally on an Ethernet network.
The packet shown above is decoded here:
- Ethernet preamble/SFD (synchronizer): 55 55 55 55 55 55 55 D5
- Ethernet destination address: 00 10 A4 7B EA 80
- Ethernet source address: 00 12 34 56 78 90
- Ethernet type: 08 00 (=IP)
- IP header: 45 00 00 2E B3 FE 00 00 80
- IP protocol: 11 (=UDP)
- IP checksum: 05 40
- IP source (192.168.0.44): C0 A8 00 2C
- IP destination (192.168.0.4): C0 A8 00 04
- UPD source port (1024): 04 00
- UPD destination port (1024): 04 00
- UDP payload length (18): 00 1A
- UPD checksum: 2D E8
- UDP payload (18 bytes): 00 01 02 03 04 05 06 07 08 09 0A 0B 0C 0D 0E 0F 10 11
- Ethernet checksum: B3 31 88 1B
Create your own packets
Here's a simple software that allows to create custom Ethernet/IP/UDP packets.Download it here. Source code is included (Delphi 6 for now - careful at Delphi XE2 as one user reported incorrectly generated packets...).

Every time you press the "Send!" button, the software builds a packet, displays it and sends it to the serial port (that will be useful later in part 3 of this project).